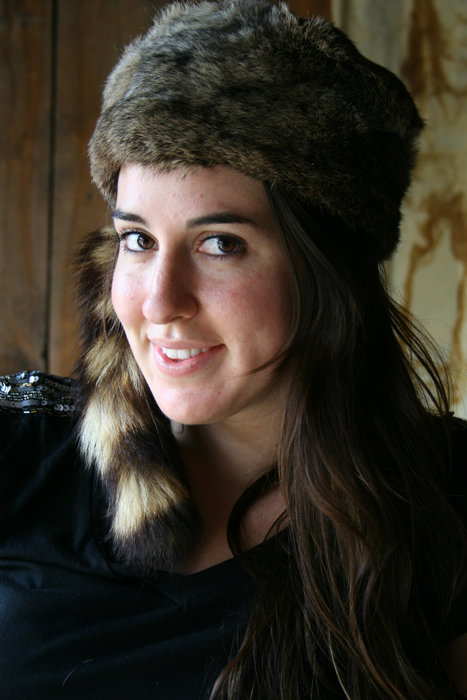
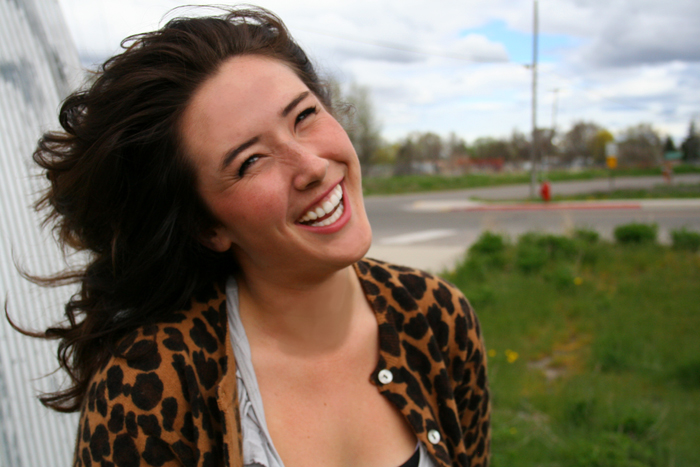
Posters

•June 20, 2011 • Leave a Comment

K.K.

18×24; 5/20/2011; 11:09 a.m.; Rexburg, ID; Canon Rebel XT; Aperture Priority; f/5.6; 1/2000.

KK has been my best friend all through high school and college. This picture captures her personality so well! She has these little cute smily eyes that squint a ton when she smiles. She has a bubbly personality and every time anyone sees this smile, they can’t help but smile back. The sky was a bit blown out and looked pretty white. So I took it into camera raw to reduce the exposure on the sky to bring back the clouds a bit. I removed a few little blemishes. I used the quick selection tool and whitened her teeth up. I increased the saturation and it really brought out all of the colors very nicely. I used the dodge tool to bring out some light in her eyes so they really twinkled. The adjustment levels helped her hair look more smooth and neat. The used the burn tool to slightly fill in her eyebrows.
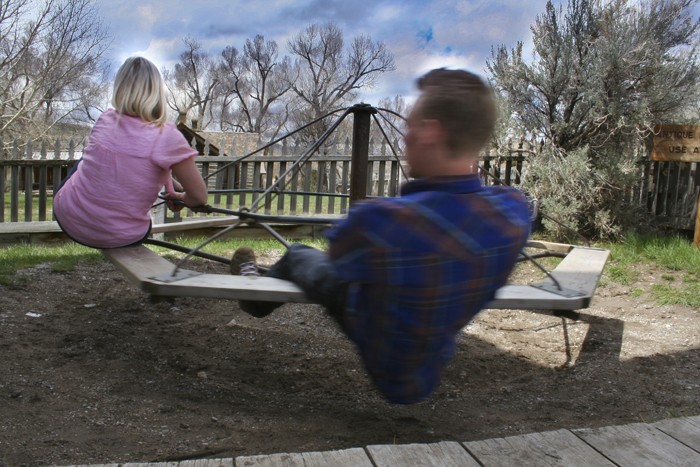
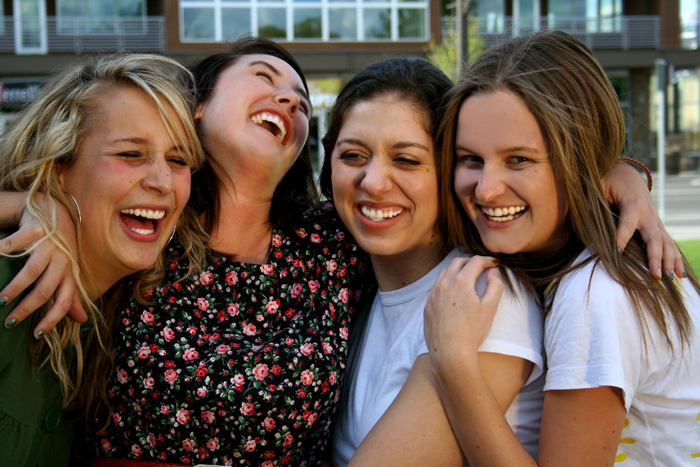


Hayden

18×24; 5/20/2011; 6:28 p.m.; Rexburg, ID; Canon Rebel XT; Aperture Priority; f/5.6; 1/400.

This is my very best friend. I chose this image because he is so special to me. I loved how the edits turned out on this shot. His plaid shirt has a lot of color in it, and so I added the black and white effect to really have focus on his face. I used the paintbrush tool to remove some of his little blemishes, but leaving the wrinkles on his forehead. I played with the adjustment levels so that there was more contrast and the shadows could really fall on his face. Then I used the dodge tool to go back and bring a little light back into his eyes and fix some funky shadows on his teeth. I adjusted his teeth by reducing the opacity from 100% to 34%. I used the adjustment brush in camera raw to bring more light onto the right side of his face. The highly feathered vignette around the edges made him pop and made the texture stick out.  I used the smart sharpen filter to bring out the clarity and sharpness in the image. I took this shot outside my shed because I liked the texture, using a gold reflector to warm up his face.


Edge Effects

•June 7, 2011 • Leave a Comment

Corkie

Bannack, MT; 5/15/2011; f/5.6; 1/200; Canon Rebel XT

Puppy Dog

Grace, ID; 5/28/2011; f/3.5; 1/600; Canon Rebel XT

In Corkie I used CI #8. It was pretty simple; I cropped the image and then changed the canvas size by adding more inches to the width and height. Then added .5 more inches to the height. The text is Gil Sans, 13 pit, and used the dark gray font color they offered. In Puppy Dog I used CI #9. In short I used the rectangle marquee tool, quick mask mode, and filter-brush strokes – sprayed strokes. Both of these could not be used without the crop tool and changing the canvas size.

Scanography

•June 6, 2011 • Leave a Comment

One-Scan Photos:

Liso

Scan; res/600; Rexburg, ID; 6/6/2011

Owls

Scanned photo; res/600; Rexburg, ID; 6/6/2011.

Ribbon

Scanned photo; res/600; Rexburg, ID; 6/6/2011.

Bannack Best

•May 31, 2011 • Leave a Comment

Before:

f/5.6; 1/80; 5/25/2011; Canon Rebel XT

All I did to edit this picture was to increase the saturation to bring out the lovely colors and tones. I love the colors in this piece of wood! Then I played with the mid tones in the adjustment levels so that the shadow wouldn’t be too heavy. That was all the editing that was done to it!

Before HDR:

f/32; 1/40; 5/25/2011; Canon Rebel XT

I used a tripod for this shot. I took this up by the mill where I had a good view of the majority of the ghost town. I shot it with three different exposure so that Photomatix could take the best lighting of each shot and make one good photo. I used Photomatix’s grunge effect to make it look like a storybook illustration.

Before:

f/5.6; 1/50; 5/25/2011; Canon Rebel XT

I used a gold reflector to give her a little bit more warm light. I shot this in the saloon. I smoothed out her skin using Photoshop’s eyedropper and paintbrush tool. I didn’t do much more editing because the light was already so nice!

Before:

f/5.0; 1/800; 5/25/2011; Canon Rebel XT

I edited this image by making in a smart object and adding an artistic filter onto it called accented edges. I played with the levels to make it a little bit brighter. Then I increased the saturation to bring out the lovely shades of mint and pink. Bannack pictures are so dark and spooky. Here I got a shot that turned out, well, pretty.

Before:

f/5.6; 1/320; 5/25/2011; Canon Rebel XT

You can see not much editing was done to this shot. All I did was increase the shadows and saturation. When I did that it really brought out that grainy old-fashioned feel to the image.

High Dynamic Range (HDR)

•May 28, 2011 • Leave a Comment

Masonic Temple

f/5.6; 1/150; 5/25/2011; Canon Rebel XT

Oven

f/5.6; 1/60; 5/25/2011; Canon Rebel XT

le Bubblay

3.5; 1/800; 5/25/2011; Canon Rebel XT

I used the Photomatix program for all of my HDR shots. They all left a crummy “Photomatix” logo on all of them, even though it was a free trial. So I used content aware and the blur tool to remove all of their logos – lame! For Masonic Temple, I blended five images to get the best exposure possible. I then used their black and white effect and increased the whites and blacks a bit. For Oven I blended five images together again for the same reason and used the paint effect. Then I increased the saturation. For le Bubblay, I did the same thing again but with only three images. I used their paint tool again, upped the saturation. I then edited the photo in camera raw, lessening the exposure along the base and right side of the image. For Village I just used Photomatix and used the grunge effect.

Macro Abstract

•May 28, 2011 • 1 Comment

Frame

f/5.6; 1/30; 5/25/2011; Canon Rebel XT

Lid

f/5.6; 1/20; 5/25/2011; Canon Rebel XT

Gold Mine

f/5.0;/1/2500; 5/25/2011; Canon Rebel XT

These are my favorite little photos to shoot. I edited Frame by simply using the adjustment levels and increasing the shadows a little but overall, not much editing done to it at all. The second shot, Tea, was edited in camera raw. I increased the saturation to bring out the pinks and greens. The third shot is a blended image. I used Photoshop and place each image on top of one another, using the overlay too. I played with the adjustment levels a teensy bit. I blended these three images:

Portraits

•May 28, 2011 • Leave a Comment

Cory

f/5.6; 1/80; 5/25/2011; Canon Rebel XT

Rachel

f/5.6; 1/60; 5/25/2011; Canon Rebel XT

Becca

f/10; 1/160; 5/25/2011; Canon Rebel XT

Malcom

f/5.6; 1/250; 5/25/2011; Canon Rebel XT

Lady

f/5.6; 1/60; 5/25/2011; Canon Rebel XT

These portraits were so much fun to take. I took all of them in the saloon, except Becca’s photo which was inside a shack. -In Cory’s photo all I had to do was smooth out his skin a bit. I used the dodge tool to slightly bring out the blue in his eyes too. In Rachel’s photo all I did was smooth out her skin. In Becca’s photo I used the burn tool to take little light spots out of her background so I could make it all black and cropped the photo so you can’t see under her arms. I used the dodge tool to light up her roots and the adjustment brush to paint a little light onto her face, adding more contrast. In Malcom’s shot I used the burn tool to add darkness along the border of the image, to eliminate the noise and help you focus on him. I used the adjsutment brush to paint light onto the right side of his face and arm. Lady’s image was a little under exposed so I bumped up the exposure in camera raw, but leaving some cool shadows. I then painted light onto her face, arm, ring, and the ruffles on her dress. I smoothed out her blemishes and used the burn tool to add a little make up to her eyes and eyebrows.

Reverse Shallow Depth

•May 28, 2011 • Leave a Comment

Wood

f/20; 1/60; 5/25/2011; Canon Rebel XT

House

f/20/; 1/100; 5/25/2011; Canon Rebel XT

I used an adjustment brush in camera raw on the first images just to lighten up the exposure on the wood. Other than that, no editing done to anything else.

Action Blur & Freeze

•May 26, 2011 • Leave a Comment

Freeze

f/16; 1/200; 5/25/2011; Canon Rebel XT

Blur

f/22; 1/50; 5/25/2011; Canon Rebel XT

I edited both of these shots in camera raw. In both I edited the sky to look darker and sort of eery by using the adjustment brush to darken the exposure. I painted light onto my subjects by using the adjustment brush. I made the freeze shot black and white.

Portraits & Enhancements

•May 21, 2011 • Leave a Comment

1. KK (individual head & shoulders).

This shot captures her personality very well! I increased the saturation for the grass and sky. I whitened her teeth and lightened her eyes using the dodge tool. I used the burn tool to fill in her brows a bit. I used the paintbrush to smooth over a pimple on her forehead and a flesh-colored mole on her chin. I used the adjustment levels to darken her hair a teensy bit just to make it look smooth.

2. Kaddy (individual – side composition). Rexburg, ID; 5/20/2011; f/4.5; 1/800; Canon Rebel XT.

Isn’t she gorgeous?! This is the shot where the background had to be 20+ ft away from the subject. I wanted to put a green background behind her because of her hair and eye color. The light was great that day! I used the paintbrush to remove her small blemishes and to lighten and smooth the puffy scar under her lip. I also used the burn tool to subtly fill in her brows.

3. Hayden (individual fully body). Rexburg, ID; 5/20/2011; f/5.6; 1/1250; Canon Rebel XT.

This picture did not have the greatest lighting. So using raw I used the adjustment brush to paint light back in behind Hayden. I also added light onto the right side of his face and body to bring out the shadow feel.

4. Log (group activity). Rexburg, ID; 5/22/2011; f/5.6; 1/800; Canon Rebel XT.

I liked this candid photo because I felt like it captured these girls’ personalities. I fixed their blemishes using the paintbrush tool. I used the dodge tool to lighten up their teeth a bit. I slightly changed the adjustment levels to add a little contrast.

5. Roommates (group posed). Rexburg, ID; 5/22/2011; f/5.6; 1/1000; Canon Rebel XT.

I have never had to do so much photoshop to one image before! Every girl had blemishes removed and teeth whitened. Marketa, on the far right, basically got her entire face airbrushed. It was tricky to make sure the colors blended well. KK, second in from the left, had a piece of her bangs hanging down so I used content aware to fill in the part of her forehead that had skin and not hair. I played with the adjustment levels just slightly. I used the gold reflector to give their skin more color and have some fun light shine on them.